Moving a piano is a complex and tedious task that requires serious manpower. It also demands the right equipment and plenty of strength.
It’s important to hire movers with specialized experience in this field. They will know how to move your instrument without causing any damage. They will use a variety of equipment, including specialized dollies, straps and padding. Contact Piano Movers In Charleston SC now!
As a musical instrument, pianos require the care and expertise of professional movers to transport them. The job requires a delicate touch and specialized tools to avoid structural damage or cosmetic harm to the instrument. Professional movers are trained in moving techniques and use their experience to anticipate challenges that can arise during a move, including weather conditions, traffic delays, or other factors that might affect the integrity of the piano. They are also equipped to handle any special requirements for the transportation of upright items, such as disassembling the piano and reassembling it at a new location.
Attempting to move a piano on your own is a recipe for disaster. Not only are pianos heavy and awkwardly shaped, but they can easily cause injury to those trying to move them. This can include physical pain and even lawsuits if the move is not performed correctly. Professional piano movers have the training and equipment to safely transport the piano to its destination, saving you the risk of injury and potential legal action.
In addition to ensuring the safe transportation of the piano, professional movers provide other benefits for their customers. They typically offer insurance options that cover the cost of repairs or replacement in the event of damage during the relocation process. This provides peace of mind for the piano owner and reassures them that their investment is protected during the move.
Another important benefit of hiring piano movers is their ability to work efficiently. Compared to regular movers, they can save you time by packing and loading your piano quickly. They can also provide storage services, if necessary.
Hiring a professional piano mover is the best way to guarantee that your piano will be transported safely to its new home. It is not recommended to move a piano by yourself, as it can be dangerous for you and your family. Moreover, it can be expensive and take a lot of time to complete the move. It is also difficult to get a reliable volunteer who will be willing to help you move your piano.
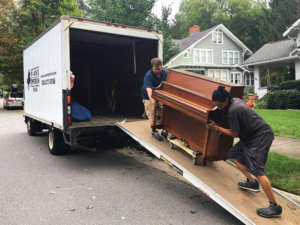
Equipment
Professional piano movers are well-equipped for the task at hand. They use specialized equipment that reduces the risk of damage during transport. They also know how to navigate the many obstacles of a move, including flights of stairs and tight spaces. Attempting to move a piano without the right equipment can result in costly damage and even ruin the instrument altogether.
Piano movers often have heavy-duty straps, dollies and ramps that are designed to accommodate the unique size and shape of the instrument. They also have vehicles with lift gates that can gently lift the piano into the truck for safe transport.
These tools help movers maneuver the piano through doorways and other narrow spaces that would be impossible to navigate with a regular vehicle or trailer. Moreover, they ensure that the piano does not bump into objects or furniture during transportation, thereby preventing damage and reducing the chance of injury to the movers.
When choosing a piano moving company, check their rates and services. Some offer flat rates while others charge an hourly rate. It is recommended to choose a reputable mover that offers affordable prices and has a good track record. In addition, the movers should provide a binding estimate and adequate insurance coverage to protect your property from damages.
If you want to save money on your piano move, consider hiring a local service. This option is less expensive than a national moving company, but it still provides high-quality service and dependable staff. A local piano moving company is likely to have a greater knowledge of the area where you are moving, and may be able to offer more competitive rates.
Before you hire a piano mover, be sure to assemble a strong team of helpers. You’ll need at least four people, and more if the job is particularly challenging. Make sure to include family members and friends who are experienced at lifting and moving heavy items. In addition, ensure that they wear comfortable clothing and shoes with adequate traction. The team should be ready to work in shifts, as this will prevent fatigue or injuries during the move.
Insurance
When hiring piano movers, it is crucial to make sure they have the proper insurance coverage. This will protect you in the unlikely event that your piano or home is damaged during the move. Most piano movers carry liability and in transit insurance policies that will cover any damages caused during the move. It is important to ask your piano mover for proof of insurance before they begin the job. It may take a little extra time but will help prevent any potential damage that could be costly down the road.
Different companies have different policy offerings that may vary in terms of coverage amounts and limitations, influencing the overall cost of insurance. Be sure to request a copy of the company’s insurance policy and carefully review it to ensure that it meets your needs.
The distance of your move and the type of home or business will also impact the moving rates. For example, a move from a rural area to a city will be more expensive than a local or same-city move. Also, the type of stairs your piano will be going up and/or any structural obstacles that may be encountered during your move will affect pricing.
If you choose to go with a full value protection plan, your piano will be insured up to its full replacement value. This option is more expensive, but provides the best level of protection in case of any damage or loss.
While a piano mover will take every measure possible to prevent any damages or losses during the move, unexpected incidents can happen. Make sure your piano mover has WSIB (Workplace Safety and Insurance Board, formerly known as Workman’s Compensation) covered, as this will ensure that they are able to compensate you in the unlikely event of any damages or injuries.
Be aware that some companies will not disclose their WSIB coverage or may give you a misleading answer. If this is the case, be sure to ask for a current WSIB clearance certificate and verify it at SAFER to ensure that they are in fact WSIB covered.
Reputation
When choosing piano movers, it’s important to look for companies with a good reputation. A company’s reputation is based on the quality of its services and how well it treats its customers. You can find information about a company’s reputation by looking at online reviews and by talking to friends who have used the service. You should also ask for a list of references so you can contact past clients and get their opinions.
In addition to a good reputation, a piano moving company should have the right equipment and experience. For example, it should know how to move different types of pianos, including spinet, baby grand, and upright pianos. It should also have the right tools for transporting pianos, such as dollies and packing tape. It’s also essential to ensure that a moving company has a team leader with enough experience to manage the move properly.
Choosing the right movers can save you time and money during your move. When searching for a piano moving company, make sure to read online reviews and ask friends and neighbors for recommendations. It’s also a good idea to get an in-person walkthrough of your home before getting a quote. This will give you a more accurate assessment of your belongings and help you choose the best option for your move.
If you’re planning a long-distance move, it’s a good idea to talk to the company about its damage policy. This will help you determine if the company has the insurance coverage you need to protect your heirloom during the move. In addition, you should also ask the moving company if it offers a flat rate or binding estimate.
A reputable piano moving company will provide you with an accurate quote and a timeline for delivery. They’ll also provide you with a detailed inventory of your items so you can easily locate and identify any damaged or missing pieces when they arrive at your new home. Some movers will even offer add-ons and specialty moving processes like single-item billing and not-to-exceed pricing, which can help you save money on your move.